Monday, April 5, 2010

Checking your emails an alternative way using mail2web

For all my fellow followers and readers of my blog you supposed to realize I didn't get to post a topic yesterday because I was a little busy so I promise I will make it up back sometime this week. Anyway today I am going to share with you an alternative way of checking your emails any time any where in the world for free. The other day I tried to sign in to my hotmail account and it keep on giving me an error message each time I tried to login so I was wondering and saying to myself what could be causing the problem so I immediately tried my other solution and that saved the day, so this is why I am posting this tip on how to access your mails and so very simple.

Mail2web is a free service that allows you to check your mails it also support the protocols used to send and receive emails such as Simple Mail Transport Protocol (SMTP) and Post office Protocol (POP) . All you have to is visit the mail2web website. When you get there you see the login section "mail2web.com - Pick Up Your Email" then the login section below. For those that are scared of computer privacy and security this site is secure if you look at the top of the Uniform Resource Locator (URL) you will see some thing like https// this means that the site is protected by Secure Socket Layers (SSL) so right there you know you are safe take a look at the screen shot below.


And this screen shot show the mail2web login screen.
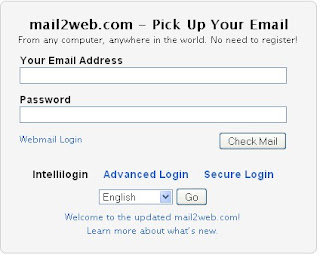


And if you are still not sure if your to login if you look beside Advance login yo see Secure Login which scrambles the connection on the server for and Phishing attacks but believe me its safe to use. I use it from time to time and I never got any form of spam or Unsolicited Bulk Email (UBE) from this website.

So from my experience using this service I use Secure Login better safe than sorry right you see what I mean. Next you should Login by using a working email account I used my hotmail account in this case but any one will work Yahoo, hotmial, Aol Gmail etc.


Next click check mail and then you will see all your inbox emails and all the settings from the original service provider no counterfeiting thing guys its genuine. The screen shot below shows all my emails that I received and read already.
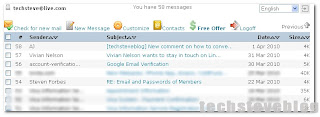


The beautiful about this site is that it also support for mails for mobile devices like your cell phones PDAs etc but it is shareware meaning you have to pay for that services but if you want it go ahead. you can also compose a new message to send by clicking on New Message at the top nice!!
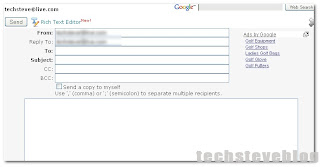


So that's it my friends mail2web on the go I hope you found this tip useful and if you have nay problem you can comment to send me an email so that I can help you troubleshoot the problem and again thanks for reading. And before I forget when you are ready to log out click on logoff at the top right above your inbox.

Saturday, April 3, 2010

How to disable chkdsk form checking C: each time you boot XP


Yesterday during the good Friday holiday I was at home all day since it was a public holiday and the computer repair shop had to be closed so I had nothing to do that much at home. I received a phone call where on of my clients complained that each time he boot up his computer it always start to do a check disk on drive C: . So he was asking me how to fix the problem because its so annoying to him so this is why I am posting this technique on how to disable check disk from checking the hard drive (chkdsk).

Chkdsk is a utility built into windows to perform various check to your hard drive for any possible bad sectors(the nightmare of hard drives). or file corruption on the disk so it tries to put the files in correct order or in a sequential manner something similar to disk defragment. This problem is caused by improper shutdown of the computer, so for example you are using a word processing application or doing a graphic art in Photoshop or Illustrator and the you had a power outage or something in common the computer did not get the chance to shutdown properly so that causes the files on the hard drive like the .sys files to be in a bad state and other non-contiguous files on the disk, so Chkdsk will start to examine the hard disk for those problem and start to fix it. But the disadvantage about the chkdsk utility is that you may see it happen each time again and you start up the computer and you start to panic, well don't worry here is how you fix the problem.

First go to start then click run then type CMD you can type in lower case doesn't matter.


This will launch the command prompt which DOS interface a black screen window with white text. Next all you have to do is type chkntfs /x c: hit the enter key on the keyboard. The "/x" is a switch command that tells the chkdsk utility to remove the function each time windows starts up and its also saved in the BootExecute entry in the registry.


When you hit hit the enter key you should get a message saying "The type of file system is NTFS". So it removes the entry in the registry, so the next time you restart the computer you will not see the chkdsk utility again.


Next restart the computer and you should be good to go again so that is it my friends I hope you found it useful and if you have any problems you can comment to send me an email so that I can help you troubleshoot the problem. See you again for more advance computer tips and trick from techsteveblog.

Friday, April 2, 2010

How to test an ISO image before burning it to a CD/DVD

The other day I was as at by my computer repair shop and one of my customer called and say that he tried to burn a copy of windows xp from and ISO file but its corrupt and it does not work. So this is why I am posting this tip on how to test an ISO image to confirm that its working before burning it to a CD/DVD.
ISO which stands for International Standardization for Organization which is a format for creating images of a CD/DVD, this disk can be a DVD of one of your favorite movie or a piece of software that you love to use on a regular basis and you cant afford to lose it so you probably decide to make an ISO image of that disk so if the original gets damages or scratched you have an image backup of the disk and ready to be burned to a CD/DVD. So you downloaded a nice program or a game that you want but each time you burn it to a CD/DVD it does not work and it keep on wasting your blank CD/DVD .

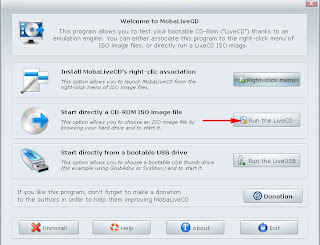
Mobalive CD is a free tiny but yet powerful program that allows you to test an ISO file and gives you a preview of the image before burning it to a CD/DVD. You can download Mobalive CD here, its only 1.52MB in size. The beauty about this program is that it does not require an installation to take up RAM and Hard Disk space its a single executable file just double click the file(exe).


Next you will get a the "Welcome to mobalive CD" window now all you have to do is click Run live CD.


Next you are going to browse for the ISO file to run I will be running windows XP Black Edition in this case. Once you select the ISO file and click open you will get another pop up window asking you to create a Hard Disk image simply click NO.


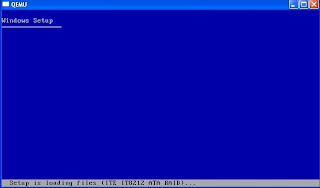
Once you click no just wait a moment and it will start loading the image in RAM as I mention before I will be running windows xp black edition ISO file the screen shot below shows the windows xp setup below.


Now from there I can determine that the ISO image is working and I can now burn the image to a CD/DVD. So there you have it I hope you may find this tip useful and if you have any problems you can comment to send me an email so that I can help you troubleshoot the problem. And before I forget if you want to exit the test screen and you don't see the mouse pointer just hit the ESC key.

Thursday, April 1, 2010

how to convert mp3 for ring tone for IPhone using Itunes

Hi my name is Steven Forbes also known as techsteve today I am going to share with you on how to convert a mp3 in a format to be played and set as your ringtone on your iphone if you dont have Itunes you can download it for free from the itunes website. Itunes is a popular software which is used by most professionals and normal computer users, it can be use to create and subscribe to podcast purchasing audio files on line and it also supports a wide range of audio formats such as mp3, aac, wav etc you know what I mean. So what I am going to show you is how to take and audio file that is ripped from a an audio CD and convert to another format so that it can be set as your ringtone for your Iphone so lets get started.

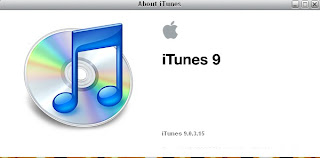
After you have download Itunes from the apple website launch the program you should see Itunes v9 installed if you are not sure go to help and select about Itunes.


About itunesItunes" id="BLOGGER_PHOTO_ID_5455168099129842162" width="400" border="0" height="270">
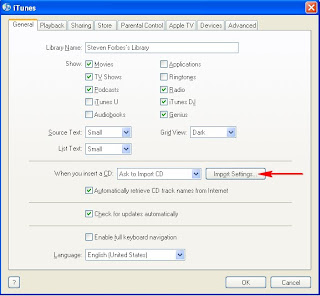
Next go to Edit and select Preferences then select import settings.


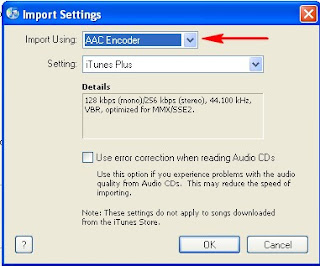
You will get the import settings dialogue box beside import using select AAC encoder click O.K and click O.K again on Preferences to accept.


Next right click and the song that you want and select Create AAC Version now this will create a duplicate or a copy of the song .
Please Note: When you select Create AAC Verison look at the main Itunes area at the top to see the convertion in progress.


When convertion is completed you will hear a sound which indicate that it is completed, the new AAC version will be located beneath the original just right click on the new converted AAC version and select show in windows Explorer. You will see the new converted song selected.


If you notice the file is now "m4a" format, we need to change it to "M4r" format the "r" by right clicking and select rename and add the letter "r".The "r" stand for ringtone so that when the song is synced to the iphone it can be recognized by the phone, if you dont see the m4a extension got to tools folder options the uncheck hide extension for known file types click O.K.


Now go back the song and you will see the m4a extension as I mentioned previously.Now all you have to do is copy the song which is the one with the m4a extension into Itunes so hold the CTRL key and drag it the song to the desktop because it will be re-imported into Itunes so drag the song the desktop or just copy and paste to the desktop, then change the m4a to m4r you will get a pop up telling are you sure you want to change the format click yes.


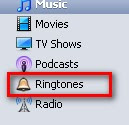
Now its time to re-import the song back into Itunes, so just delete the copy of the song that you use to create AAC verison. to verify that it is song you want to delete right click and select get info beside Kind you will AAC format. Now just drag the song into Itunes and if you look in the task pane on the left you will see Ringtones.


Now when you click on ring tones you will see the song in the ringtones section and Violla!!!! thats it you can now sync the song to your iphone as your ring tone thanks to this nice trick using nothing but Itunes and again this technique is free. So I hop you like this post and I hop you find it usefull if you have any problems you can email me if possible and again Thanks for reading stay tuned for more post on a daily basis of advance computer tips and trick on Microsoft word 2007, PowerPoint, Excel, Publisher web design and development Podcasting and much, much more!