Thursday, April 29, 2010

How to browse the web with two search engine from Poly Cola

They are billions of websites on the web and doing web search can be daunting and troublesome at times. I always tell my clients that any body can search the web but finding what you want takes a little more practice and patience. So today I am going to show you how to use two of the world's most popular search engines on the web Yahoo and Google, aka Gahoo yoogle.
I have posted this as a video tutorial on you tube but I will embed the links and stream it from youtube at the end of this blog post.

PloyCola.com a website that allows anyone to search the web using two search engines at the same time. All you have to is launch you web browser and and type in the URL and navigate to poly cola website


Now if you notice you can search for Videos, News, Images, Shopping etc just from one browser nice!!. So just type in your search query and click PolyCola Search and see your results.


You will notice that you get a split screen with a scroll bar in the middle of the window you can also hover the mouse over the Google's search results and yahoo to automatically re-size the window with JavaScript. Now you can compare the results with both search engine to see which one gives you a better result. Remember your Keywords is what makes a good web search engine Crawl O.K so that's all about it for this post you can also view my short tutorial on this post also and thanks for reading.

Tuesday, April 27, 2010

How to Fix jump drive opening with disk heal

Yesterday at my computer repair shop a customer came with a complain that each time he tried to open his flash drive it always give him the open with dialogue box and he has to use windows explorer to open the flash drive. So this is why I am sharing this post with you today, the reason for this problem is when ever your flash drive is infected with an autorun.inf virus the anti-virus will remove it if there is any(at the root of the drive e.g X:/). So after the virus have been removed it deleted the original autorun file which is hidden be default so when you try to open it, it will give you the open with dialogue box as shown in the screen shot below.


Disk Heal is a free software which is used to fix removable drive errors and other things like disabling users tweeking the computer's privacy and security etc. It is only 413kb in size and does not take up a lot of ram either, it also works on windows 2000/XP/Vista/7, you can download Disk Heal here.
some of the features are as follows:
  • Fixes Task Manager inaccessibility
  • Fixes Folder Options inaccessibility
  • Fixes Registry Editor inaccessibility
  • Can’t access any of the above three features, Disk Heal fixes this problem
  • Fixes File/Folder inaccessibility:

Use disk heal to fix this problem. After you have downloaded the program and install an icon will be placed on the desktop that looks like a screw driver and a wrench.

When you launch the program it is a very simple User Interface (U.I) all you have to do is click on the Fix tab at the top.

Next go to My Computer and look at the drive icon followed by the letter example F:/, now go back to Disk heal and type in the name of the drive letter beside "Fix disk problems type drive letter and click fix" option the click on the Fix button.

Now you will get a pop warning box telling in order for the changes to take effect you should reinsert your flash drive. So that is what I did in order to fix the customer's flash drive and it was good to go again, now you can go back to my computer and double click on your flash drive without worries OK. You can also preview my tutorial video below this post. Thanks again for reading and I hope you found it useful .


Monday, April 26, 2010

Controling hardware components in your Laptop with Notebook Hardware Control

In laptops because of the tightly packed components in machine causes your laptop computer to overheat and shut off at times. This sometimes results in CPU overheating intense processing speed, another common overheating problem found mostly on the Compaq Pressarios and HP Pavillions is the graphics chip overheating and causes the laptop to have video problems such as no display on the LCD, scrambled video on the LCD display. So when ever a time you are on your laptop and it just shutdown without a warning then that is a sign of overheating, so today I am going to show you a program that you can install to control the amount of heat generated by the internal components inside your laptop or hardware components in general.

Notebook Hardware Control(NHC) is a program designed for laptop and desktop computers when it comes to internal components and heat related issues. It works on windows 98/2000/XP/vista/7, some of the features it include are as follows:
control the hardware and system power management
- customize the notebook (open source ACPI Control System)
- prolong the battery lifetime
- cool down the system and reduce power consumption
- monitor the hardware to avoid system failure
- make your notebook quiet

Notebook Hardware Control (NHC) isn't only very powerful, it has a friendly program surface, it's easy to use and free for private use. A large number of users appreciate these advantages and NHC becomes one of the leading programs to control the power and hardware of modern notebooks. So all you have to do is go to the download website to download a free copy of the program. Once the program is installed you will notice a small icon at the system notification area that looks like a battery showing the percentage of the battery status and a little speedometer icon also.


Next double click on the speedometer icon to open the main interface which gives you a general overview of the CPU usage clock speed etc.


There is two versions of this program the basic and the professional one but the basic on will do fine but when it comes to paid version you should get maximum service you see what mean. So there you have it I hope you found it useful and again thanks for reading.

Friday, April 23, 2010

How to password protect a Microsft Office 2007 Suite File

Over the last few days when my internet connection was down I could hardly get to post a blog on a daily basis and sometimes I am a little busy and couldn't get to post any blogs. Today I am going to share with you on how to password protect a Microsoft Office 2007 Suite file whether it is a Word file an Excel Spreadsheet or a Power point Presentation or what ever type of document that you have. So for example you mock up a very valuable spreadsheet document and emailed to a person and a Scammer hacks or spams your email address and then gain access to your to your well presented spreadsheet file and damage the data in the file. If you password protect the file the Scammer has no way of gaining access to the file if, the only way a scammer will ever get into that doccument is if that scammer is a good programmer and use what are Macros. A Macro hides the internal scripts inside of a word document and requires an advance to intermediate computer person to use it but dont worry I will show how to create your passwords wisely so lets get started.

To password protect your document open a document that was created or create a new document. Next Click on the Office 2007 Orb button the screen shot below shows what I am talking about.


Next click and hover over Prepare and then you will get pop up menu, select Encrypt Document.


Now all you have to do is type in the password for your document and you are good to go.


If you read the caution where it says if you forget the password it cannot be recovered so make sure you make sure you note down that password. So there you have it you have successfully password protect your document, and again this works an all of the office suite. So that's all I have to say and again thanks for reading .

Thursday, April 22, 2010

How to fix Task Manager not showing menus and tab buttons

Yesterday one of my clients called and told me that when ever he opened the Task e Manager it does not show the menus and the tab buttons, so he says that he thinks it is a virus. So I told him to do a quick scan with his Anit-Virus program and it did'nt find anything. So I remembered one day last year I stumbled up on a same problem like this, for those who have never seen a problem like this look at the screen shot below.


So in order to fix the problem just double click on the bottom right corner beside the End Process button of the window and you're done when I told him what to do he laughed and say how silly he was and though it was a virus or something. Now you should be able to see your task manager showing both menus and tabs.


So I hope you found it useful and again thanks for reading.

Tuesday, April 20, 2010

How to fix Auto play problems on USB Flash Drives

Yesterday at work one of my co-worker came to my office to put something on her flash drive it was a Kingston 2GB flash drive. So I plugged it in and as usual scan with ikill for any possible viruses and it was clean. After the jump drive was installed I didn't see the auto play options dialogue box window so I had to manualy open the drive from My Computer which I didn't like, so I remeber a small little program callled auto fix that can fix these problems.

Auto fix a tiny program developed by Microsoft used to fix errors found on your flash drives and it is unique in its own little way it is small in size and doesn't take up much ram. It also works on windows 98/2000/xp/vista not sure about windows 7 but it should work. You can download Auto Fix here, after you have downloaded the program plug in your flash drive and run the executable file. you will see the user interface in the screenshot below.


Now all you have to do is click Next.


For me I didn't have any problems so far because the Repair buttons are grayed out but if you see the repair buttons for both options appear just click Repair for both options and click Next.


Now Select the flash drive you want to repair in my case I used mine then click Next.


For me my jump drive was OK but I am just showing you this just for demonstration purposes now all you have to do is click Repair for all three options then click Next.


I clicked on Begin test and it started to do an Auto play events test on the flash drive , so all you have to do is click on Repair and click Next then click Finish and you're done.


When you're finish unplug the flash Drive and insert it in back and you should see your auto play options dialogue box appear Nice!!!!. If you don't see it restart the computer for the changes to take effect. And if it still does'nt work repeat the steps again. Well I hope you found it useful and again thanks for reading techsteve blog.

Saturday, April 17, 2010

How to disable Automatic Updates Restarts in Windows XP

The other day I was around my laptop computer doing some work and I installed some updates. After I have installed the the updates and rebooted the computer and was continuing to use it, it keep on poping up the the Automatic Updates Restart now or Restart Later update window as shown in the screen shown in the screen shot below.


So it became quite annoying and I did some googling to see if I could get it off, I found a little program that could disable the automatic update feature once and for all.

Leavemealone
a tiny program that it designed just for this problem and I used it to solve the problem, you can download leavemealone here. And what I like about this program is that it is small in size and it does not reqire an installation just download and extract the file and run it. When it opens you will get a tiny window as shown in the screen shot below.


Now all you have to do is click Leave me alone! and you're done, and before I forget make sure you have .Netframework 2.0 or higher installed which can be downloaded from here before you attempt to download Leavemealone. Well I hope you find it usefull and thanks for reading.

Thursday, April 15, 2010

How to remove Autorun.inf Virus from Jump Drive or any Storage Media

For the past two days I have not posted any blogs because I was a little busy and my internet connection at work was down for the moment, so I am able to post a topic this morning. So what I am going to share with you today is how to remove an autorn.inf virus from a jump drive or any storage media but I am focusing mainly on the USB Jump Drives. Many times when a computer is infected with a virus is that it reproduces itself automatically without our knowledge and often cause many abnormal behavior on our computer. So for example you just baught a brand new Jump Drive and you say to your self that this jump drive will never be infected with a virus or any malicious programs. So you went to a friend of yours computer and plugged in your clean jump drive that has no infection what so ever into your friend's computer and that 's it your jump drive becomes infected so easily and you take it home and plugged it into your computer and your computer becomes a ZOMBIE!!. So many people today are in great fear when it comes to jump drives and viruses even if the computer has an Anti-Virus installed.

IKill is a program that was developed by the Aprantech team, now this program was developed specially for USB Jump Drives and it works on Windows 98/2000/XP/Vista not sure about Windows 7 yet. You can download IKill here, after you have download it make sure you have .Netframework 2.0 or higher installed on your computer before installing IKill you can download .Netframework here also. After Ikill is installed you will be prompt wiht the Ikil interface.


Now make sure you have Enable Auto Protect checked and Start up with windows that is optional as you can see I don't left it checked and I rather leave it unchecked because if you have a floppy disk drive it will continuously scan the drive and the activity LED on the drive will light up continuously this took me a long time to figure out the problem so that is why I leave it unchecked, but if you don't have any floppy disks drive at all you can go ahead and leave it checked. So all you have to do is plug in the flash drive or any storage media and make sure the ikill window is opend thescreen shot shown above. For on the safer side if you want to know if the drive is infected just go to My Computer and look at the drive image it should look like the screen shown below.


This indicates that the drive is infected and ikill will remove the autorun.inf virus from the root of the jump drive. Now all it is waiting for is you to double click that icon and your computer wil become a ZOMBIE!!. Once Ikill has removed it from the drive you flash drive icon shoould look like this screen shot below.


That's the correct way it should look in the My Computer window just like when you just purchased you Flash Drive. Another way to find out if a jump drive is infected is when you plugged the jump drive into the computer and you get the Auto Play option make sure to select open with windows explorer.


This way your computer will not be infected because you did not double click from My Computer. Another way to launch Windows Explorer is to hold down the windows logo key and "E" on at the same time on the keyboard. So that's it no more worries about USB drives and viruses with Ikill to the rescue and again thanks for reading. If you have any problems you can comment to send me an email so that I can help you troublshoot the problem.

Monday, April 12, 2010

How to back your up Flash Drives, Ipod or any storage media using USB Image Tool

Over the weekend I was a little busy so I didn't get to post a topic for the past two days so I am back again for now posting one this morning. Over the weekend I went to Portmore to repair a desktop computer which had a windows crash so I had to back up the clients data and reinstall a fresh copy of windows XP. So When I realize that I left my hard Drive enclosure I had nothing to back up the files all I had was my 8GB jump Drive Which only had about 4.5 GB of storage left so I started to think about how to get started because the client couldn't afford to loose her precious data and I didn't want to loose mine either. Anyway I remembered a trick I used 2 years ago in Spanish Town then I came to a conclusion with a tiny software and that saved the day. So today I going to share with you on how to backup your Flash Drives, Ipod or any Storage devices to an image like an ISO format, so that you can restore the image at any time if you had any problems in the future.

USB Image Tool is a freeware program that can be used to back up your Flash Drives, Ipod or any Storage device. its only 393kb in size and only works on Windows XP/2003/Vista. This program does not require and installation. So if you have a Flash Drive or Ipod or any storage device as I mentioned earlier and if it got stolen or lost or even got corrupt you can easily restore that image which is a backup of your storage device onto your new one, so nice isn't it. So this is what i did over the weekend formatted my Flash Drive after I made an Image in order to get more space to backup the clients files, then when I am finished I just restore back the image I didn't loose a thing. You can download USB Image Tool here.

After you have download the program just unzip it with you favorite extraction program i use winrar or winzip you can do a google search for it and its free.

Please note: Make sure you have .Net Framework 2.0 or higher installed on your computer in order to run USB Image tool you can download .Net Framework from the Microsoft website here.


This is the interface it is very simple to use, now all you have to do is plug in your Flash Drive or Ipod or what ever storage device you have. You will see the flash drive name info in the left column.


Next click on the name of the drive to select it then all you have to is click on Backup.


Then it will ask you to browse for a location and give it a name to save the backup image you can use any ware like the Desktop or where ever you wish but I use My Documents then Click Save
You will see the backup process at the bottom Saving image.


Once the backup is complete you can close the program and you're done so easy wasn't it now you have successfully backed up your image. If a time comes that you have to restore the image just launch the program again and select Restore browse for the backed up image to restore the file on the storage device MAKE SURE THE STORAGE DEVICE IS PLUGGED INTO THE COMPUTER.


So that's it you can try it for your selves I found it useful over the weekend and I hope you found it useful too. Thanks for reading and if you have any problems just post a comment on this tip to send me an email so that I can help you troubleshoot the problem.

Friday, April 9, 2010

Weekly Fab Five to things to keep computer safer and up to date

In this time and age of the computing industry computer crimes and scams is a popular one, keeping you computer up to date and ensure proper computer privacy and security is a major issue. So today I am sharing another useful tip hopefully on how to do these five simple steps which I call the weekly Fab five. And they are as follow:

  1. Get a Firewall (Hardware/Software) a firewall is a barrier or an access control that stands between your computer and the internet examples of a firewall is a wireless router(Hardware) or Norton Internet Security Firewall (Software).
2. Update your Anti-Virus and Anti-Spyware programs this can be done manually by going on the vender website of you Anti-Virus and Anti-Sypware and download the latest definitions that provide, examples of good anti-virus programs are like AVG, Norton Anti-Virus(an Excellent one), Kaspersky Anti-Virus and Avast Professional.

3. Start Patch Management this simply means updating your operating system Microsoft releases updates every second Tuesday of each month which is called patch Tuesdays for those who are using a windows operating system(O.S). Download and installing updates from your vendor O.S keeps your computer up to date to the latest exploit out there.

4. Check your Hard Drive they are a lot of hard disk monitoring tool that are freeware and shareware that you can use to constantly checking your hard drive especially for disk defragmenting of the hard drive keeping files in the correct order. My favourite one is The Defraggler free of and easy to use. Or you can use the built in one that came with windows Disk Defragmentor which is located in the system tools in the start menu under Accessories.

5. Last one Back up your Data the data on your computer is what talks to your computer its like gold on your computer in most cases without data your computer is just a lump of hardware so back up your data. You can back up to CD/DVD jump drives and Online servers that supports FIle Transfer Protocol (FTP) . So you cannot afford to lose precious data so BACK UP, BACK UP, BACK UP.

So practicing these 5 weekly to do things and your computer will more optimized and a little more SAFER remember there is no computer out there 100% safe, you only can make your computer more SAFER. So thanks for reading again I hope you found it useful.

Thursday, April 8, 2010

How to disable unwanted programs during windows startup

In windows each time you boot up your computer it loads the default programs at start up. Sometimes this causes the computer to gradually becomes slow and often time results in system lock ups. Today I am going to share with you how to disable unwanted programs from start up each time you boot up the computer. From my point of view I don't like when I start up my computer and see unnecessary programs start up each time I booted the computer, when I first installed Apple Quick time player it starts up each time I boot up the computer and it normally comes up at the system notification area and it is quite annoying .

Sysinternals Autoruns in a free program that you can use to monitor all file activity during windows start up and in windows explorer on your computer. It works on windows 98/2000/xp/vista/winodows7 and only 581kb in size and takes up about 8.4mb of ram you can download Autoruns here. After you have downloaded Autoruns just install it and launch the application.


This is the Autoruns interface, fairly simple one but has a lot of tabs at the top. So to use the program just select the Everything tab this will give you a complete list of all file activity on your computer.


Now what I like about this program is that it is user friendly and it gives you a graphical interface of each program and there icons that you can select to disable. Now in my case I will be disabling Apple Quick time so if you see the program that you want to stop running at start up go ahead.


So I have uncheck the mark beside the Apple Quick time because I don't want it to start up each time I booted windows. So that's all there is to it my friends no more unwanted programs during your computer's booting up process. And before I forget you can use the windows built in utility to do the same but its not user friendly it requires an advance computer user to use it but if you want to give it a try you can use it, just go to start then click run for vista users if you don't see the run command just press and hold the windows logo key on your keyboard and R key at the same time and type msconfig select the Start up tab at the top then uncheck the program to be disabled then restart the computer, but use at your own risk, because if you disable the wrong program you computer will behave abnormal. So thanks for reading.

Wednesday, April 7, 2010

How to Burn an ISO image to a CD/DVD

Today I am going to share with you on how to burn images to a CD/DVD this image can be in various image formats such as the popular one which is ISO, you also have other types such as BIN, CUE etc but its the same just the format is different. Yesterday at my computer repair shop a good friend of mine came to the shop complaining that he downloaded a copy of windows XP which was a modified version that can be used to downgrade his HP Pavilion DV9000 series laptop from the windows vista so he said that he was trying to burn the image for a good while and he wasted about 4 DVD blanks because he was using a DVD to burn the image, so he asked me to help him out so I showed him how it was done. So this is why I am posting this one for those who might thinking about burning images in the future.

Ashampoo Burning Studio 9 is a burning program used to burn data, images, copying from CD/DVD's etc. It is a shareware application meaning you have to pay but don't worry I will give you my keys so kind of me isn't it. you can download Ashampoo Burning Studio 9 here. After you have downloaded the program install then it will ask you to
select some option select enter keys at the bottom use the keys that I gave to you below the image.


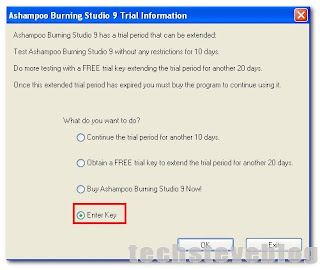
BRS9GF-77DR11-GAS54A
BRS9UI-77IF5E-AGP52

Any one will work click 
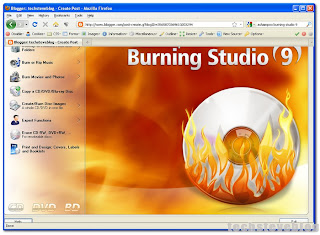
Register to accept and your done. Then its Time to burn the image to a CD/DVD. Open Ashampoo burning studio 9 on the desktop if you tell the installer to put the icon on the desktop otherwise you have to use start all programs.

Next choose the way you want the you want the program to look then click O.K. Then the program will launch depending on the speed of your computer. Then you will see the interface of the application.


Next select Create/Burn Disc images then select Burn images to a CD/DVD and you will see the formats it supports.


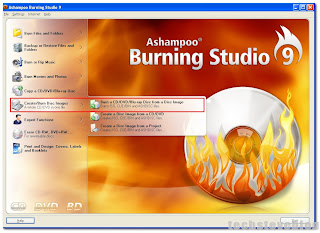
Then it will ask you to browse for the image in this case I will use the AVG rescue CD you should get the idea.


After you find the image to burn click next, then it will ask you to insert a blank CD/DVD into the drive the click write. Now you can sit back and watch the image being burned to the CD/DVD when it is finish it will give you an alert message saying that the image was burned successfully and thats it. You may wonder why I did'nt mentioned other programs like Nero, Roxio, Image Burn well I dont recommend you to use programs like Roxio or Image Burn they are not so reliable but you can you use Nero instead it works fine but I prefer Ashampoo because it never fails for me all the other fail more often but its up to you if you want to use Nero or any other burning software out there but I just showed you my way of getting it done easily with hassle. O.K that's it my friends I hope you find it use full and you can comment to send me an email if possible if you have any problems. Thanks for reading.

Tuesday, April 6, 2010

How to delete a file that cant be deleted normally


The other day I was testing an ISO image file which was the new AVG rescue boot CD that allows you to clean viruses from an infected computer if the computer wont boot into windows normally. So after I finished tested the image file and I was trying to delete the image because I have already backed up the image on my live server on the web. So I am going to show you a simple tool to use that you can easily use to fix the problem.

The Unlocker a free tiny little program that runs in the background and watch all file activity on your computer is very powerful in its own little way I used it for the past 2 years now and it works fine. The beauty about this program is that it takes up a small amount (2.3MB) of ram, the unlocker can be downloaded here. After you install the unlocker look at your system notification area where your time is located and you will see a little magic wand.


Next all you have to do is right click on the file that you want to delete and you will see the magic wand again in the menu then give that a click.


Next you will get a window which is the unlocker interface it is very easy to use just click select the object or file to be deleted and select Unlock All


Now all you have to do is try deleting the object again and it should be deleted flawlessly and that's it you're done no more head aches my friends so thanks for reading again and I hope you find this post use full again and if you have any problems just comment on the post to send me an email and I will help you to troubleshoot the problem.

Monday, April 5, 2010

Checking your emails an alternative way using mail2web

For all my fellow followers and readers of my blog you supposed to realize I didn't get to post a topic yesterday because I was a little busy so I promise I will make it up back sometime this week. Anyway today I am going to share with you an alternative way of checking your emails any time any where in the world for free. The other day I tried to sign in to my hotmail account and it keep on giving me an error message each time I tried to login so I was wondering and saying to myself what could be causing the problem so I immediately tried my other solution and that saved the day, so this is why I am posting this tip on how to access your mails and so very simple.

Mail2web is a free service that allows you to check your mails it also support the protocols used to send and receive emails such as Simple Mail Transport Protocol (SMTP) and Post office Protocol (POP) . All you have to is visit the mail2web website. When you get there you see the login section "mail2web.com - Pick Up Your Email" then the login section below. For those that are scared of computer privacy and security this site is secure if you look at the top of the Uniform Resource Locator (URL) you will see some thing like https// this means that the site is protected by Secure Socket Layers (SSL) so right there you know you are safe take a look at the screen shot below.


And this screen shot show the mail2web login screen.


And if you are still not sure if your to login if you look beside Advance login yo see Secure Login which scrambles the connection on the server for and Phishing attacks but believe me its safe to use. I use it from time to time and I never got any form of spam or Unsolicited Bulk Email (UBE) from this website.

So from my experience using this service I use Secure Login better safe than sorry right you see what I mean. Next you should Login by using a working email account I used my hotmail account in this case but any one will work Yahoo, hotmial, Aol Gmail etc.


Next click check mail and then you will see all your inbox emails and all the settings from the original service provider no counterfeiting thing guys its genuine. The screen shot below shows all my emails that I received and read already.


The beautiful about this site is that it also support for mails for mobile devices like your cell phones PDAs etc but it is shareware meaning you have to pay for that services but if you want it go ahead. you can also compose a new message to send by clicking on New Message at the top nice!!


So that's it my friends mail2web on the go I hope you found this tip useful and if you have nay problem you can comment to send me an email so that I can help you troubleshoot the problem and again thanks for reading. And before I forget when you are ready to log out click on logoff at the top right above your inbox.

Saturday, April 3, 2010

How to disable chkdsk form checking C: each time you boot XP


Yesterday during the good Friday holiday I was at home all day since it was a public holiday and the computer repair shop had to be closed so I had nothing to do that much at home. I received a phone call where on of my clients complained that each time he boot up his computer it always start to do a check disk on drive C: . So he was asking me how to fix the problem because its so annoying to him so this is why I am posting this technique on how to disable check disk from checking the hard drive (chkdsk).

Chkdsk is a utility built into windows to perform various check to your hard drive for any possible bad sectors(the nightmare of hard drives). or file corruption on the disk so it tries to put the files in correct order or in a sequential manner something similar to disk defragment. This problem is caused by improper shutdown of the computer, so for example you are using a word processing application or doing a graphic art in Photoshop or Illustrator and the you had a power outage or something in common the computer did not get the chance to shutdown properly so that causes the files on the hard drive like the .sys files to be in a bad state and other non-contiguous files on the disk, so Chkdsk will start to examine the hard disk for those problem and start to fix it. But the disadvantage about the chkdsk utility is that you may see it happen each time again and you start up the computer and you start to panic, well don't worry here is how you fix the problem.

First go to start then click run then type CMD you can type in lower case doesn't matter.


This will launch the command prompt which DOS interface a black screen window with white text. Next all you have to do is type chkntfs /x c: hit the enter key on the keyboard. The "/x" is a switch command that tells the chkdsk utility to remove the function each time windows starts up and its also saved in the BootExecute entry in the registry.


When you hit hit the enter key you should get a message saying "The type of file system is NTFS". So it removes the entry in the registry, so the next time you restart the computer you will not see the chkdsk utility again.


Next restart the computer and you should be good to go again so that is it my friends I hope you found it useful and if you have any problems you can comment to send me an email so that I can help you troubleshoot the problem. See you again for more advance computer tips and trick from techsteveblog.